Thursday, 19 June 2014

simply eat. salad // satay noodle salad


I love anything satay...well, anything with peanut butter in it is pretty darn good, right? This was a recipe born out of a new gadget purchase...a julienne peeler! Yes I know I should be worried that a kitchen utensil brings so much excitement to my life but hey, it's the little things that can make us the happiest! 

So anyway, a julienne peeler makes fine long strips of veg, which you can get from chopping, but this is so much quicker...and it makes things like carrots look a lot like noodles...can you see where this is going? And so a noodle salad combo was born! 

This is a veggie dish but feel free to add in any leftover meat you may have OR if you really want to pad this dish out to make a larger portion (say for dinner) then just shred a load of fresh salad leaves, top with the noodles and serve alongside some grilled chicken or fish.


what you need...serves 2
  • 1tbsp Peanut Butter (smooth or crunchy, whatever you have to hand...)
  • 1tbsp Hoisin Sauce
  • 1tsp Soy Sauce
  • 2tbsp Warm Water
  • 1/2 a lemon/lime
  • 2 medium Carrots
  • 1 Courgette
  • 1-2 Spring onions (depending on their strength, remember if you have this at lunch you may not want to stink of onion all afternoon...)
  • 1tsp Grated Ginger (optional)
  • 1/2 a 375g Bag of Readycooked Rice Noodles (or whatever noodles you have, cooked according to instructions, I just had these leftover from a stir fry...)
  • 2 Handfuls of Cashews roughly chopped
  • 1tsp each Sesame and Poppy Seeds

simply...
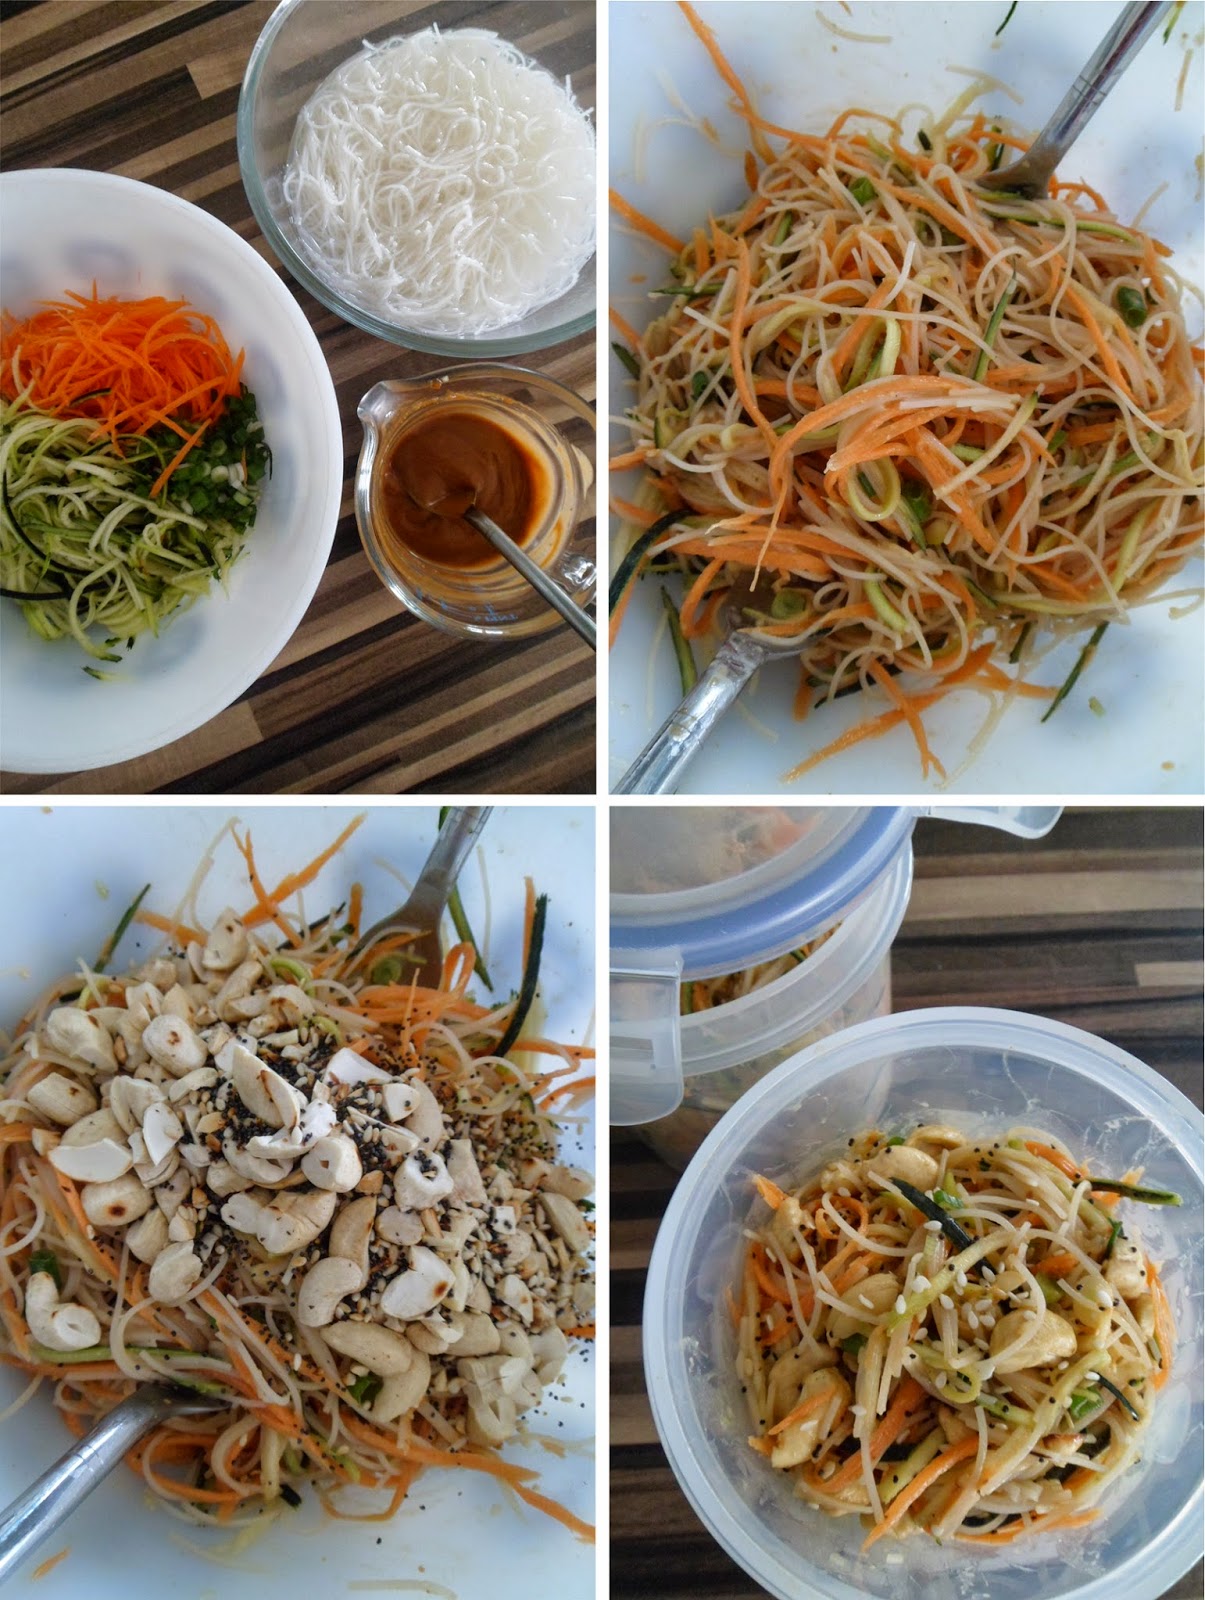
  • Combine the Peanut Butter, Hoisin, Soy and Water in a small jug and stir well to combine, you may need more or less water depending on how thick your PB is...the sauce should have the consistency of thick salad dressing.
  • Julienne the carrot and courgette, finely chop the spring onion and finely grate the ginger. Tip into a large bowl and toss with a squeeze of lemon/lime juice. 
  • If you don't have a fancy julienne peeler the next quickest option would be to use the large side of a box grater, make long strokes with the veg to get a similar effect. Or if you have super knife skills then chop finely.
  • In another bowl tip in the noodles and just cover with boiling water, the noodles are already cooked this is just to refresh them.
  • Drain the noodles and add to the veg, top with the sauce and toss really well to coat every strand in satay goodness...
  • In a dry pan add the Cashews and seeds, whatever you have really but I think cashews are a must!
  • Toast the nuts/seeds, keep them moving so they don't burn you want them just warm and golden.
  • Toss through the salad and portion into pots.  


***

Monday, 16 June 2014

simply eat. tried and tested // pineapple with mint sugar


Image from Jamie Oliver

All I can say about this recipe is WOW...it really is one of those amazing flavour combos and makes you wonder why you have never had it before! It's so fresh and zingy, incredibly simple and makes a great crowd pleasing dessert that you can prepare in advance, perfect for summer parties...

I actually didn't make this myself but had it when visiting my Dad yesterday, hence the photo borrow from the Jamie Oliver site! His other half had made it as shes a foodie too...we had a wonderful dinner of roast chicken and a variety of gorgeous salads so this just it topped off! 

So if that gushing review has made your mouth water then head on over HERE to get the recipe, plus I think this could easily work with other fruit,  melon and mango in particular...enjoy!x


***

Tuesday, 10 June 2014

simply eat. lunch // salad topped flatbread


Lunch is one of the hardest meals for me when I'm at home, work is different I plan things to take in, but at home I get lazy and often just have a bowl of cereal...so this little beaut of a recipe is super tasty and super quick to knock up plus a tad more interesting than a plain old sarnie! (or cereal...)

It came about after a rummage in the reduced bread section at Tesco, seeing this garlic and parsley flatbread for about 60p...I love a bargain, plus bread stuffs freeze so well! But this little flatbread was not destined for the freezer that day...oh no, it was going to live its remaining few minutes as a gorgeous salad, tomato and feta topped mega snack! Enough talk, here's the info...

What You Need... serves 2
  • One Flatbread of choice (I recommend one with added stuff just for extra flavour, garlic, sundried toms etc...)
  • Handful of Cherry Toms
  • Around an Inch off a block of Feta
  • Couple of handfuls of Mixed Salad leaves
  • Balsamic Glaze (or just Balsamic vinegar) for drizzling
  • Pepper

Simply...
  •  Turn your grill on and leave to heat while you prep the minimal ingredients.
  • Chop tomatoes and feta into rough chunks, pop onto the flatbread and season with ground pepper. (NO salt please as feta is salty enough!)
  • Grill the flatbread, toms and feta until warm and slightly crispy.
  • Remove and leave to cool for just a minute before topping with the salad and drizzle with balsamic glaze/vinegar.
  • Chop into wedges, stuff into face and enjoy...


I love it when a recipe just comes together out of a load of random stuff and tastes as good as this did! A fab summer lunch even if I do say so myself...hope you're enjoying the sunshine everyone!x


***

Tuesday, 3 June 2014

simply eat. recipe scrapbook // 3 scrumptious salads


all photos belong to their respective blogs, see links below for sources


Summer is here! Well, sort of...it's more that it's here one day and then gone for the next week...but never mind because these bright and colourful salads should help remind us of glorious sunshiney days even though it may be grey outside. 

These salads come from my Pinterest boards, my virtual 'scrapbook' for collecting recipes from around the web...I have yet to try these but keep reading and maybe like me you might give one or two a go this summer. After all who said salads should be bland and boring!?

1// Avocado, Strawberry, Spinach Salad with Poppyseed Dressing by Gimme Some Oven, three of my all time favourite ingredients in one salad! I have never tried strawberries in a savoury capacity before but this salad sounds so good it is worth a try...

2// Heirloom Tomato and Avocado Salad with Chickpeas by Love and Lemons, this salad just spells summer, gorgeous ripe tomatoes, bright green avocados and creamy chickpeas...delish

3// Crunchy Cashew Thai Quinoa Salad with Ginger Peanut Dressing {vegan, gluten-free} by Ambitious Kitchen, a salad that packs a whole bunch of flavour with it's ginger and peanut dressing combined with the super-grain Quinoa and a load of other crunchy gorgeous ingredients... 


(Why not open a Pinterest account and then you can 'Pin' all your favourite recipes in one place too?)


***

Friday, 30 May 2014

simply eat. kitchen buys // chopping boards by Syco


All Images from Sycos' Etsy Shop  //  1  2  3

Something a little different for the weekend but still kitchen related... These fun chopping boards are by a small designer I discovered via Etsy, (if you've not come across Etsy before I suggest you take a peek!) I love the fun colours and quirky 'appliqued' style fruit and veggies. Best part is that once you're done chopping you can hang them on the wall to admire all the time... Hope you have a lovely weekend friends x


***

Tuesday, 20 May 2014

simply eat. drinks // sweet green smoothies


So here it is! I did indeed promise you this recipe yesterday (if you can call it a recipe) for a 'Green Smoothie for Beginners'. Now I only recently started making smoothies with spinach myself and I have been pleasantly surprised... Although it looks like it should taste horrible the spinach just adds a 'freshness' to the smoothie, not to mention it packs an Iron punch! Which for me is an added bonus as I don't eat a great deal of red meat in my diet.

I think this recipe works because of the combination of sweet fruit as well as the spinach so it doesn't taste too different compared to the all fruit kinds of smoothie. This would be a great smoothie for sneaking veggies into a kids diet PLUS it's also an awesome super-hero green colour! 'Hulk' smoothies anyone?

Ingredients
  • 1 medium Banana
  • 1/2 ripe Mango
  • 2 handfuls of Spinach
  • 2tbsp Low Fat (0% fat) Yoghurt
  • Orange Juice/Tropical Juice - Fresh stuff only please not the stuff from concentrates! 
  • Nutrition Tip: The Vitamin C in Orange juice helps the body to absorb the Iron in the spinach, the perfect smoothie match!

Simply...
  • Pop all the fruit and yoghurt into a blender, top up with juice until it comes around a 1/3 of the way up the fruit.
  • Blend on low to start and then ramp it up to blitz all the ingredients until smooth.
  • This makes one large glass serving OR two smaller glasses.

Smoothie Tips!
  • I like my smoothies fairly thick but I always start with LESS juice than needed and that way you can always add more if you want.
  • I like to make sure that at least one of my smoothie ingredients is frozen, in this case the banana, as it makes the smoothie lovely and cool without the need to add ice cubes which waters down the flavours.
  • If, like me, you don't like drinking smoothies straight from the glass (as the thick texture can feel a bit weird) just use a straw!
  • If you're making a smoothie as a replacement meal, say for breakfast, then adding in a handful of oats makes it more filling and the fibre will keep you going for longer. (Don't add oats to this recipe as the fibre can inhibit the absorption of the Iron in the spinach.)


***

Monday, 19 May 2014

simply eat. breakfast // yoghurt, oat and blueberry muffins


I have a confession, I'm not a huge blueberry fan...don't hate me! On their own I just find them a bit woolly and no where near as satisfyingly juicy as other berries. BUT when baked into a crumble, muffin, pancake or even a sauce their gooey juiciness just shines as they 'pop' in your mouth...

So this muffin recipe is from my good old faithful book, Muffins Fast and Fantastic by Susan Reimer. This is THE muffin bible in my opinion, we acquired it from a boot fair years ago and I swear every single recipe we have tried from it always produces perfect muffins. Well risen, soft inside and with just the right amount of sweetness (in my opinion). We aren't fond of super sweet cakes in this house which is why we bake our own rather than buy sugary supermarket versions full of additives.

These muffins are ideal for breakfast as they are packed with fibre from the oats which release energy slowly and the addition of yoghurt as well as milk means a good hit of calcium. Plus the Blueberries are a great source of antioxidants, as well as being tasty!

Anyway enough talking about muffins let's get to the good stuff...oh and see that VERY green looking smoothie? Pop back tomorrow for the recipe, if you've never tried a 'green' smoothie before this one is perfect for first timers...

Ingredients
  • 3oz/85g Oats
  • 4-5oz/110-140g Brown Sugar (as I mentioned above these aren't overly sweet but you can decide if you want less or more sugar)
  • 1tsp Bicarbonate of Soda
  • 8floz/240ml Low Fat (or 0% fat) Natural Yoghurt
  • 3floz/90ml Vegetable/Sunflower Oil
  • 3-4floz/90-120ml Milk (add more or less depending on the size of your egg)
  • 1 Egg
  • 1/2tsp Vanilla Extract
  • 7oz/200g Self Raising Flour
  • Fresh Blueberries

Simply...
  • Preheat the oven to 190-200c/375-400f/Gas 5-6. Line a 12 hole muffin tin with cases.
  • You will need 2 large mixing bowls and a measuring jug for this recipe.
  • In the first bowl weigh in the Oats, Sugar and Bicarb, stir just to break up the brown sugar as this can be clumpy. On top of the oat mix add in the Yoghurt.
  • In the jug first measure in the oil, then the milk and lastly the Egg and Vanilla. Whisk to combine.
  • Tip the oil, milk, egg, vanilla mix into the bowl with the oat mixture, stir well to combine and put to one side whilst you prepare the last few ingredients. This gives time for the oats to swell and the Bicarb to do it's stuff.
  • In the other bowl weigh in the Flour and add in the Blueberries, I have left the measurement for this blank as it really depends on how big your blueberries are and how many you like in your muffins! Remember not to put in too many or the muffins will be mushy, I use roughly half a small punnet.
  • Tip all the wet oat mix into the flour and stir well to combine, be sure to get right to the bottom of the bowl to get all the flour! Once no more flour is visible in the mixture STOP stirring. 
  • Muffin batter is supposed to be lumpy and the more you stir it the tougher your muffins will be!
  • Divide between the 12 cases, I like to make sure there's the odd blueberry sitting near the top so it pops and that bright purple bubbles up onto the surface...or just bung the mixture in!
  • Pop in the oven to bake for 20-25 minutes OR until golden and springy to the touch. Remember they will look darker than normal as they have brown sugar in them.
  • Once done remove from the oven and take out to cool on a wire rack.
  • If you can leave them to cool they will come away from the paper case easier but there's something about a warm muffin that is just too tempting...

Hope you give these beauties a go, they freeze really well too. Just pop them in a freezer bag when they have completely cooled and to defrost just leave them out overnight, maybe pop them in a microwave to heat them through slightly if you like.

Don't forget to pop back tomorrow for the smoothie recipe!x


***